Labels

Tuesday, March 19, 2013

Quick Chicken Pot Pie

I don't know about the rest of you girls out there but, I get cravings and let me tell you, I have to give in occasionally.  So, here I am, making chicken pot pie... NOM

This recipe is really easy to make and delicious.  Surprisingly, it's less than 500 calories per serving too!

Ingredients:

  • 1/3 c. butter
  • 1 small yellow onion, diced
  • 1/3 c. flour
  • 1/2 c. milk
  • 1 3/4 c. reduced sodium chicken broth
  • 1/4 c. grated Parmesan cheese
  • 16 oz mixed frozen veggies, thawed and drained
  • 1/2 rotisserie chicken, shredded and chunked
  • 1 can reduced fat crescent rolls
  • salt, to taste
  • pepper, to taste


Directions:
  1. Preheat the oven to 350 degrees
  2. In a medium saucepan (at least 2 quarts), melt the butter over medium heat.  Add the onions, salt, and pepper.  Cook until the onions are tender. 
  3. Gradually add the flour, whisking constantly until well blended and the roux is complete.
  4. Gradually add the milk and chicken broth.  Stir occasionally until the mixture is thickened and bubbly. Stir in the Parmesan cheese.
  5. Add the mixed veggies and chicken to the saucepan.  Remove from heat.
  6. Spray a 9x13 glass pan with Pam Olive Oil.  Spread the mixture into the pan and top with the crescent rolls.  
  7. Bake for 15-20 minutes at 350 degrees, or until the crust the is desired golden brown.

ENJOY!


Monday, March 4, 2013

Spinach Mushroom Onion Pasta

Have any of you ever watched Chopped on Food Network?  I tend to watch it when I am bored.  Well, my boyfriend and I are traveling this weekend, and hate wasting food, so we haven't done much grocery shopping the past few days.  Luckily, I have watched chopped enough to find this empty refrigerator a great challenge, not a "take-out" opportunity.

So, I threw together a pasta dish.  The only meat we had available to us was chicken.  We had some mushrooms and onions cut up (that I eat in omelets every morning), of course garlic (I am a firm believer in "everyone should have garlic laying around"), and some spinach from salads left over. Then, to the cabinet... what do I see?  A box of thin spaghetti from while ago.

I usually make my own sauce (growing up in a part-Italian family makes you learn to hate all of the jar sauces at the grocery store).  Well, poop, I don't have any of the ingredients for an Alfredo sauce... well why not just a garlic and olive oil sauce?  Sounds good!

Ingredients (none of these have been measured, I went off of taste):

chopped onion
sliced mushroom
chopped spinach
chicken breasts
garlic powder
minced garlic
onion powder
basil
oregano
salt
pepper
cooked pasta
Parmesan cheese (if desired)

Directions:

  1. Coat the chicken breasts with garlic powder, onion powder, basil, oregano, salt, and pepper.
  2. Cover the bottom of a skillet with olive oil, add approx. 1 tbsp minced garlic, place over medium heat.  Cook the chicken breasts until fully cooked. 
  3. Remove the chicken from the skillet.  Add about 1 tbsp of minced garlic and cover the bottom with olive oil.  Add as many onions and mushrooms as you want. Allow to cook for 2-4 minutes (so the mushroom and onion are the desired tenderness).  Add as much spinach and pasta as you want.
  4. Once the pasta has warmed up and the spinach begins to wilt, remove from heat.  Serve with a piece of chicken and top with Parmesan cheese, if desired.
I was surprised at how easy and fun this was to challenge myself to make!  

ENJOY!


Thursday, February 14, 2013

Crochet Small Basket with Handles

My friend recently moved to the area and of course (if you have read a previous post) I made her a gift basket, literally. I hadn't even considered crocheting a basket so, this has to be fun, right? I didn't even have to go looking for the pattern... I already had the pattern pinned on my pinterest page!  I saw these baskets and fell in love with them.


The basket shown is the smallest size for the pattern I found.  So, the pattern I followed--with modifications, or course-- is the one I found here.


Modifications include:

  • Instead of holding 2 skeins of super thick and chunky yarn together, I held 4 strands of worsted weight yarn together.  I ended up using Red Heart Super Saver yarn in Aran Flecks.  The pattern took a little less than 2 skeins of yarn.  
  • I extended the base of the pattern by one round.  So, after Round 6, I continued to increase so my final stitch count was 56 instead of 48. (Message me if you have a question about this)
  • For the handles (Round 14-15 in the pattern):
    • Rnd 14: Ch 2, hdc in next 9 sts, ch 12, skip the next 10 sts, hdc in next 18 sts, ch 12, skip the next 10 sts, hdc in the next 9 sts, join with sl st
    • Rnd 15: Ch1, sc in the same st and in the next 9 sts, work 15 sc under the ch 12 space (do not work into the stitches, instead when you would go into them, go under them instead), sc in the next 18 sts, work 15 sc under the ch 12 space, sc in the next 9 sts, join with sl st, F/O and weave in ends


This basket makes a great gift.  I might make one for my boyfriend as an Easter basket this year.

ENJOY!

Thursday, February 7, 2013

Wrap Around Baby Booties

So, I don't know about everyone else but, I am at the age where my friends are starting to have babies (crazy, I know, but they are mostly older than me).  So, of course, I want to make them something cute to start off their young ones lives.

I have made baby booties in the past so, why not try another pair... right?  During my search, I found these gems... Aren't they absolutely ADORABLE?????


They don't look too hard to make so, I searched in google for "crochet baby wrap around boots pattern" and lucky me, I found this pattern from I'm Topsy Turvy  

I have made three pairs of the booties following the pattern on the blog, two for friends having babies and a work friend ordered a pair from me!  


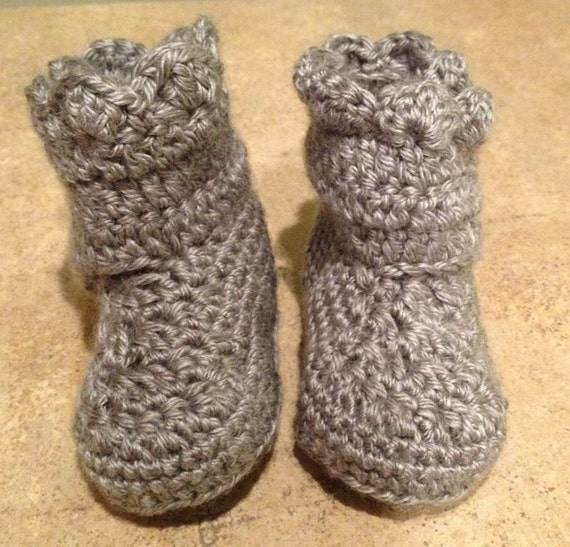
Then, I had a request from the same work friend.  Her daughter received an American Girl Doll for Christmas this year (so exciting, I had one as young girl) and she was wondering if I could make one to fit the doll.  So nice of her to want to surprise her daughter with something special!

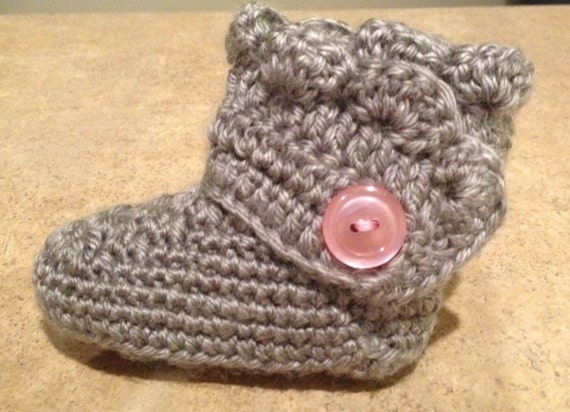
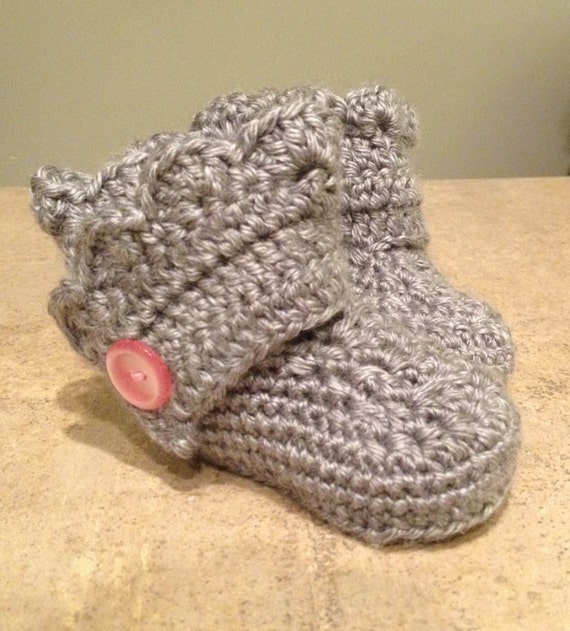
First I had to find out the size of the doll's feet (2-5/8" x 1-3/8") and then I started experimenting with the pattern.  Here is what I went off of:

Materials:

4.00mm crochet hook
Caron Simply Soft yarn in Grey Heather
2 pink buttons

Abbreviations:

ch: chain
sc: single crochet
hdc: half double crochet:
sc2tog: single crochet 2 together
dc2tog: double crochet 2 together
dc3tog: double crochet 3 together
sl st: slip stitch

Directions:

Sole
ch 11
Rnd 1: sc in 2nd ch, sc 3 times, hdc 3 times, hdc 7 times in last ch, (other side of initial chain), hdc 3 times, sc 3 times, sc 4 times in last ch, sl st in first sc (24)
Rnd 2: ch 1, sc in same sc, sc 5 times, hdc, 2hdc 3 times, 3hdc, 2hdc 3 times, hdc, sc 6 times, 2sc 3 times, sl st in first sc (35)

Boot
Rnd 1: ch 1, (working in black loops for the entire round) sc around (35) --if you sc in the same sc at the beginning, your seam will be nicer looking
Rnd 2-3: ch 1, sc around (35) --if you sc in the same sc at the beginning, your seam will be nicer looking
Rnd 4: ch 1, sc in the same sc, sc 7 times, sc2tog, dc2tog, dc, dc3tog, dc, dc2tog, sc2tog, sc around, sl st (29)
Rnd 5: ch 1, sc in the same sc, sc 5 times, sc2tog, dc2tog, dc3tog, dc2tog, sc2tog, sc around, sl st (23)
Rnd 6: ch 1, sc in the same sc, sc 3 times, dc, dc3tog, dc, sc2tog, sc around, sl st (19)
F/O weave in ends.

Boot Cuff
for the right boot, sl st in the 4th st from the seam
for the left boot, sl st in the 8th st from the seam
(there will be 3 sts in the front of the boot--dc, dc3tog, dc)
ch 15
Rnd 1: hdc in 3rd ch from hook -first 2 ch counts as first hdc, hdc in next 11 ch, hdc in first sc (the one you sl st in), hdc 16 times (there will be 3 spaces left), skip 3 spaces, sc in last space.
Rnd 2: ch 2 (counts as hdc), turn, hdc in first hdc, hdc around, (when there are 4 sts left) ch 1 skip one hdc, hdc in last 3 sts 
Rnd 3: ch 2 (counts as hdc), turn, hdc in the 3 hdc, hdc in ch1 space, hdc around 
Rnd 4 scallops: turn, 5dc in second dc, [skip 1 hdc, sc in next hdc, skip 1 hdc, 5dc in next hdc], repeat around (10 shells), sc down the side (I do 2 for each row so a total of 6 down the side), continuing around sc across the bottom along the original chain, sl st, F/O and weave in ends

I hope someone else can get use out of this pattern modification for another doll!  Pictures of the doll boots to come! 

ENJOY!

Please note: Patterns are for personal and charity use only.  If you enjoy the pattern, please link to it, but do not copy the pattern to your own website or blog.

Tuesday, January 29, 2013

Etsy Shop

Hey Guys!  I recently made an etsy.com account and plan on selling some things I am making.  It is called Emily's Hook Creations, please take a look!


Monday, January 28, 2013

Crochet Frog Beanie

Hello All!  I started a new project last night for my nephew's 2nd birthday present... a frog beanie!

He loves "ogs" (as he calls them) and dressed up as one for Halloween this past year.  I found the pattern on a blog I follow on blogger.  However, this beanie is only for up to 18-month olds.  Well, no big deal, I can fix this!

Here are my modifications:

  • I took the "shaping the beanie" out to 84 stitches (instead of stopping at 78)
  • I also did not follow the earflaps, I crochet them a way I came up with when I made when I crochet a Dino-RAWR earflap beanie 
  • My braids aren't quite as long as the ones from Janet's blog
  • When making the eyes, I crochet through both loops to make the color look more uniform 
ENJOY guys!

Sunday, January 27, 2013

Crochet Wine Bottle Cover

One of my best friends moved into the area (YAY) so, of course I am putting together a house warming gift for her.  There are many things that I have seen about what you should give: Bread so you'll never go hungry. Candles so you'll always have light through the darkest times. Honey so you'll always enjoy the sweetness of life. Olive Oil so you will be blessed with health and well-being. Salt so there will always be flavor and spice in your life. Wine so you will always have joy and never go thirsty.

Well instead of following this closely, I have decided to make my own version: Wine so you can have a good time (on girls day when we drink wine and watch movies), a wine bottle cover (so nobody knows we are boozing), a basket (to keep the wine--among other things-- in... duh), a wine bottle opener (well we need to open it don't we), and love (since I am crocheting the wine bottle cover and basket for her).

So, let the pattern search begin!  The baskets were easy to find (I actually found the pattern a while ago and have been itching to make one of them).  But, I was looking and looking and looking and could not find a free crochet pattern for a wine bottle that I liked so, I decided to make one of my own!

Materials:
worsted weight yarn (medium 4), I used 'Loops & Threads Impeccable' in True Grey
5.0mm(H) crochet hook
stitch markers
white ribbon
scissors

Abbreviations:
magic ring: here is a tutorial for right handed crocheters
sc: single crochet
st: stitch
sts: stitches
sl st: slip stitch
ch: chain
MC: main color
CC: contrasting color

Directions:
Note: this pattern in made in continuous rounds so, use a stitch marker to mark your first stitch (to make my bottom nice and flat, I prefer to sc through both loops in rounds 1-7)

Round 1: 6 sc in magic ring (6sts)
Round 2: 2 sc in all 6 sts (12 sts)
Round 3: [sc in next st, 2 sc in next st] around (18 sts)
Round 4: [sc in next 2 sts, 2sc in next st] around (24 sts)
Round 5: [sc in next 3 sts, 2sc in next st] around (30 sts)
Round 6: [sc in next 4 sts, 2sc in next st] around (36 sts)
Round 7: [sc in next 5 sts, 2sc in next st] around (42 sts)
Round 8: sl st in the first st, (in back loops) sc around (ending in the sl st) (43 sts)
Round 9-46 (my wine bottle took about 37 rows to make it to it's lower neck but yours might be different so, yours could vary in length): sc around (42 sts)
Round 47: [sc in next 3 sts, ch 3] around (42 sts)
Round 48-55: sc around 42 sts)
Round 56: sl st around (42 sts)
F/O and weave in ends.

I then decided that I would make a small heart ornament for the ribbon.  I found the pattern relatively easy but, I did modify the pattern--I only completed round 1!  After the slip stitch, I chained 11 and slip stitch into the first chain, F/O and weave in the ends!  Super cute and super easy!


Please note: Patterns are for personal and charity use only.  If you enjoy the pattern, please link to it, but do not copy the pattern to your own website or blog.